How to change your version of your Mac OS?
- Open Terminal and enter
sudo nano /System/Library/CoreServices/SystemVersion.plist
and enter your admin password. - Change the two strings "10.11" to "10.12". Leave the minor version number (e.g. 0, 1, 2...) like it is. Hit ctrlO and Enter to write the file to disk.
- Hit ctrlX to quit nano
How to change screenshot format png → jpg
To save screenshots in JPG, execute the following commands in the terminal:
defaults write com.apple.screencapture type jpg;killall SystemUIServer
macOS also support: tiff, pdf, bmp & pict.
Launch Sublime Text 3 from the command line & simlink to Subl
These instructions assume you’re using the Terminal app out of the box, without ZSH or any fancy prompts like that. I trust you will be able to adapt these instructions yourself if you do.
Step 1 : Create a symlink called sublime
sudo ln -s "/Applications/Sublime Text.app/Contents/SharedSupport/bin/subl" /usr/local/bin/sublime
Step 2 : Check that your system profile can find the symlink you just created.
open ~/.bash_profile
Step 3 : Add both these lines & then save the file :
alias subl="open -a /Applications/Sublime\ Text.app"
export PATH=/usr/local/bin:$PATH
Step 4 : Reload your bash_profile :
source ~/.bash_profile
Done ! You can now navigate to any of your code/script folders in Terminal and open them in Sublime with the following commands :
subl .
subl .zshrc
How to Stop .DS_Store File Creation on Network Volumes in Mac OS X
To disable the creation of .ds_store files, launch the Terminal application from /Applications/Utilities/ and enter the following command string exactly:
defaults write com.apple.desktopservices DSDontWriteNetworkStores true
Reboot the Mac for changes to take full effect.
Customize OS X's Login Screen with Any Logo You Want
The login screen on your Mac is perfectly functional as it is, but if you want to spice it up a little bit, blogger Jacob Salmela shows you how to customize the login screen with a logo of your choosing.
If you don't want to install a whole program just for a simple tweak it's easy to do manually. All you need is a PNG that's 428 X 248. Then, you'll need to save it as four different files.
Here's instructions:
You need four copies of this file, and they need to be named:
- apple.png
- [email protected]
- apple_s1.png
- [email protected]
Once they are named correctly, just drag them into the following path:
/System/Library/PrivateFrameworks/LoginUIKit.framework/Versions/A/Frameworks/LoginUICore.framework/Resources/
and then choose to replace all of them.
That's it, log out, and you should see your new logo. Head over to Salmela's site for a few sample images and instructions for making your own.
Git: Fix warning: unable to access '/.config/git/ignore': Permission denied
After I check the folder, I just know that the folder owned by “root” user.
ls -lah
sudo chown whoami .config
How to Stop DS_Store File Creation on Network Volumes in Mac OS X
To disable the creation of .ds_store files, launch the Terminal application from /Applications/Utilities/ and enter the following command string exactly:
defaults write com.apple.desktopservices DSDontWriteNetworkStores true
[solved] How to removing the blurred login screen in Mac
First - open Finder -> Go to folder -> /Library/Caches
The second - find file com.apple.desktop.admin.png and replays it with your image ;) filename need be same = com.apple.desktop.admin.png. You also may rename jpg file to png without converting.
How to Lock the Mac Screen from Terminal in OS X
Open Terminal and enter the following in a single line:
/System/Library/CoreServices/Menu\ Extras/User.menu/Contents/Resources/CGSession -suspend
[solved] How to delete all emails from your Mac?
Launch the Terminal, you'll see a list of all your messages. From the mail prompt, do
$ mail
? delete *
? q
And that should be it. Make sure do to the q after the delete * command, that saves the changes to disk.
How to disable the drop-shadow in Mac OS X window screenshots?
Here’s the command. Just paste this line into your Terminal, and press return.
defaults write com.apple.screencapture disable-shadow -bool true
killall SystemUIServer
To test out your new screenshot settings, just take a quick screenshot by pressing the key combination command-shift-4, followed by the spacebar. You should end up with a beautifully clean window screenshot, free of drop shadows. The best part about this is that your screenshot’s dimensions will now finally match the window’s dimensions, without all that added padding introduced by the drop shadow. Nice, huh?
If you no longer want these cleaned up windows, you can switch back to the normal shadowed screenshots by pasting the following into your Terminal:
defaults write com.apple.screencapture disable-shadow -bool false
killall SystemUIServer
Well done!
Is there a way to shift focus on buttons in OS X?
On Windows, I could use Tab to shift focus from button to button, so I could "click" on the desired button without having to use a mouse.
It appears that I can't do the same thing on a Mac, or is there a way to do it that I didn't realize?
There is. From System Preferences, under Keyboard » Keyboard Shortcuts, you can enable Full Keyboard navigation. You can also change this by pressing Control+F7
[solved] How to install pip, BS4(Beautiful Soup), and update Python v2.7 to v3 on Mac
MacOS comes with Python installed. But to make sure that you have Python installed open the terminal and run the following command.
python --version
If this command returns a version number that means Python exists. Which also means that you already have access to easy_install considering you are using macOS/OSX. Now, all you have to do is run the following command.
sudo easy_install pip
After that, pip will be installed and you'll be able to use it for installing other packages. For try if pip working well use:
pip --version
If you want install another modules - you can do this, for example:
pip install regex
Then runing
sudo pip3 install beautifulsoup4
[solved] How to Fix macOS Sierra when u reinstall macOS to El Capitan
How to fix OS X application can't be verified | OS X El Capitan | macOS Sierra | Yosemite Corrupted or Damaged during Downloading in Easy Steps.
"This copy of the install OS X Yosemite (any OS X) application can't be verified. It may have been corrupted or tampered with during downloading"
Try change system date using Terminal and it will work. Run this command in Terminal (go to Utilities -> Terminal):
Date 0320015315
Date 0320015315 (month_date_time_year) String of numbers = month 03, date 20, time 0153, and year 15, combined.
A Beautifully Productive Terminal Experience iTerm, Oh-My-Zsh
Every developer can benefit from using the command line. Whether you use it to bounce between projects or create complex scripts, getting familiar with the command line can drastically improve your workflow.
In this post, we’ll cover some of the great tools available for streamlining your command line experience.
How to install powerlevel10k/powerlevel10k shell: https://gist.github.com/kevin-smets/8568070
After some experimenting, I’ve found that using a combination of iTerm 2, Oh-My-ZshZsh, Prezto, Z, Trash & Origami for Sublime Text - makes for an extremely productive setup.
How to customize the Terminal on your Mac
I love the terminal. Besides the fact it makes you look awesome while using it.
What we will be making
Oh My Zsh is installed by running one of the following commands in your terminal. You can install this via the command-line with either curl or wget.
[solved] How To Delete Mail from Terminal in macOS
If you show message in terminal “You have mail” you can delete all messages
sudo rm /var/mail/<your-username>
If you want send mail via terminal use commands:
mail -s "hello" "[email protected]" <<EOF
hello
world
EOF
You can access the mail by simply using the command
Add Spaces to Dock in OS X
To add a "space" to the dock in OS X, open up Terminal.app and enter this. Enter it as many times as you want spaces. Error on too many, they are easy to remove.
defaults write com.apple.dock persistent-apps -array-add '{"tile-type"="spacer-tile";}'
They won't show up until you force restart the Dock with:
killall Dock
To remove them, just drag them up and out of the Dock like any other icon. To move them around, click and drag.
How to Disable Spotlight on El Capitan
For disable spotlight run this commands in terminal and process mds_stores will be disable
sudo launchctl unload -w /System/Library/LaunchDaemons/com.apple.metadata.mds.plist
Bluetooth Not Available on your's Mac
From the OS X Finder, hit Command+Shift+G to summon "Go To Folder" and enter the following path:
/Library/Preferences/
- Locate the file named “com.apple.Bluetooth.plist” and delete it (you may see a com.apple.Bluetooth.plist.lockfile too, if so delete that as well) – this is a system folder so you will need to authenticate with an admin user
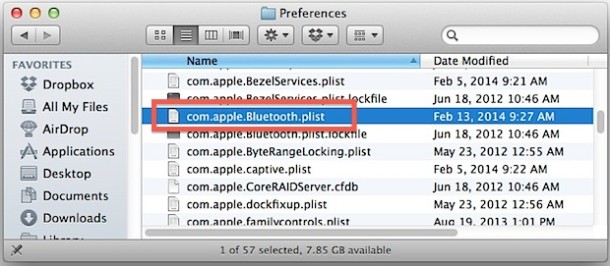
- Head to the Apple menu and choose “Shut Down” to power down the Mac
How to enable Tab Completion in Mac OS X Terminal
Launch Terminal and be in the home directory to get started:
- Using emacs, nano, vi, or whatever your favorite text editor is to edit .inputrc, we’ll use nano for the walkthrough:
nano .inputrc
- Paste in the following three rules on unique lines:
set completion-ignore-case on

set show-all-if-ambiguous on

TAB: menu-complete
- Hit Control+O to save changes to .inputrc followed by control+X to quit
- Open a new Terminal window or tab, or type “login” to open a new session with the rules in effect
- Start typing a command, path, or something else and hit the Tab key to see the improvements firsthand
Make Launchpad Bigger (or Smaller)
Enlarging the Icons
Let's say you want to change the grid size to four rows by four columns of app icons , which will make for significantly bigger icons. Open a Terminal window (open Finder, select the Applications list, and then in the list of applications double-click Terminal within the Utilities folder), and type the following two lines, the first of which refers to the number of icon rows and the second of which refers to the number of icon columns:
defaults write com.apple.dock springboard-rows -int 4
defaults write com.apple.dock springboard-columns -int 4;killall Dock
Then activate Launchpad to see the changes
Shrinking the Icons
To make the icons smaller, we simply increase the grid size. Increasing the grid size to 10x10 icons will shrink the icons significantly into a compact layout but still leave them usable. It can be done as follows by typing these two lines into a Terminal window:
defaults write com.apple.dock springboard-rows -int 6
defaults write com.apple.dock springboard-columns -int 12;killall Dock
Краткие советы для Macbook Air
В целях экономии ресурсов системы OSx, можно снизить на 10% потребление электроэнергии. По умолчанию Spotlight потребляет около 14% (взято из моего Activity Monitor - AVG Energy Impact). После выполнения этой команды в Терминале, мы отключим индексацию поиска в Mac и получим снижение потребления до 0%.
sudo mdutil -a -i off
чтобы вернуть индексацию нужно выполнить команду
sudo mdutil -a -i on
Естественно проделывать этот трюк нужно тем, кто активно не использует поиск в своем Macbook Air. Я его вообще не использую и пользуюсь TotalCommander.
Второе — отключить создание локальной резервной копии. Она занимает лишние несколько гигабайт, а когда у вас всего 128 ГБ, то каждый из них — на вес золота. Сделать это можно при помощи данной команды:
sudo tmutil disablelocal